Assignment 5 – Sketchbook and Research

Part 5; Hornsey Road Fire Fighters working sketches and Research

Sketch Training_web

I went to Hornsey Road Fire Station to photograph the Fire Fighters following getting permission from the Station Chief. I did not really know what to expect, whether I would just get some portraits of crew members and shots of the Fire Station or something more. As it turned out the crew were really accommodating and allowed me to photograph them as they went about their regular and daily testing procedures. I could not really draw there as they had no time to pose for me, and would tend to get called out at a moment’s notice, so it was better to do my research photographically and sketch from that reference later.

Sketch Training individuals_web

From a wide selection of photographs I selected some of the ones that I felt made good story telling compositions as well as the ones that I felt would make good portraits.

Sketch checks_web

It was the process of selecting the storytelling images and sketching them out that I decided to divide my project into two paths, one series of portraits that I would do in oil pastels, another that I would do in a more sketchy style that represented daily life.

Sketch Changing Kit_web   Sketch Map_web


The conditions that I had agreed to with my contact at the Fire Station stipulated that I would represent the crew fairly and in correct uniform in my artwork, so although I was not after a photo-real look I wanted to have some level of accuracy about my drawings. I felt that if I was to have accurate sketches, I could introduce an element of looseness and energy into my drawings with the colour element. I drew on some of the research I had done on the recommendation of my tutor and looked at a few suggested artists:

Marlene Dumas A Warhol

Andy Warhole by Marlene Dumas

I really liked the simple use of limited colour, loose organic painterly brush work and slight translucency of the colour whilst still retaining an element or realism and accuracy.

Joan Eardley Two Glasgow Lassies 1962-3

Joan Eardley Two Glasgow Lassies 1962-3

With Joan Eardley’s work I liked the sketchy line work over the rough colour base. The characters are maybe more stylized than I wanted to go for, but there is an energy in her work that I wanted to draw from.

franck-lesieur-jenny-saville-2011

Franck Lesieur Jenny Saville 2011

This close up by Jenny Saville was inspiring for the painterly brushwork. I like the powerful composition, but did not want to create cropped portraits for my work as I wanted to show the Fire Fighters in their official kit, but I did want to take from her work the layering and painterly effect in the tonal aspect of her work and apply some of this to my oil pastels in the colours and mark making that I used.

lepard-Radiometric-and-Speed-Dating-2009-oil-on-canvas-66x54-inches

Nick lepard – Radiometric and Speed Dating 2009 oil on canvas 66×54 inches

With Nick Lepard’s work I wanted to draw from the energetic mark making with colour to bring out the light and dark areas and loose abstract background.

Yan Pei-Ming - Life Souvenir

Yan Pei-Ming – Life Souvenir

Looking at Yan Pei-Ming I was inspired by the monochrome and drippy nature of the overlaid mark making, an aspect that really wanted to utilize.

Jerome Lagarrigue -The Poet and the Moon

Jerome Lagarrigue -The Poet and the Moon

This image by Jerome Lagarrigue I also found very inspiring, His work was being exhibited by Galerie Oliver Whitman in Paris. The focus on the face with the additional smaller background focus, as well as the markmaking were aspects that I wanted to draw upon for my portraits in Oil Pastel. I did decide to do the backgrounds of my portraits in Conte Pastel and very minimal as this would knock the background back while still showing enough to give the image context and hopefully bring more focus to the portrait.

The final image that I wanted to draw from as inspiration was one that I did with spot colour in Part 4 of Drawing 1:

20180708_175629

I had really enjoyed using pen to draw with and the way the red brought the image to life and represented the England Colours. In my Fire Fighter sketches I wanted to pull the main colours that stick in your mind when you think of Fire Fighters which is Red and Yellow. I wanted the colours to sit on top of the paper rather than sink into it as felt that that would help accentuate the detail.

Sketch Colour tests_web

I put the base down of Quink Ink to create the monochrome look over the drawing, from the sketches I found that it was better to draw the image first with permanent pens, I preferred the Faber Castelle PITT pens after buying and testing a number of brands to ensure that they did not bleed when I went over then with a wash. My tests explores mixing the colours with water to thin the colour and mixing them together to get an orange. I realised that I had to be careful as acrylic inks are very unforgiving, no mistakes allowed!

Sketch comp_web

After one visit to the Fire Station when I was asked to do a drawing of the whole watch I did some experimentation with how I might represent them. I tried doing a mixed size compilation composition, however I moved away from this idea in the end in favour of depicting the crew in official line up for my oil pastel series as I felt this gave the individuals more authority and respect.

Sketch Portraits_web

Having drawn Green Watch and then red Watch in a line up, I decided that as a series it would be more interesting to draw the watch getting into uniform, so when I came to draw White watch I took lots of pictures of the individuals getting ready and put the chosen images together into the composition.

Sketch White Watch_web

I felt that having the figures in action made for a much more interesting image, and as a series it would tell the story of the sequence of dressing that they had to go through in order to wear their full kit.

I found that I was more confident in bringing a compilation of images together to make up my composition as I had completed more of my drawings. The fact that I had not captured the image that I wanted in my research photographs no longer  mattered so much as I could tell the story in my image  by bringing together material from different photos.

Research:

All accessed January 2019

marlene dumas portraits

https://www.google.com/search?q=marlene+dumas+portraits&source=lnms&tbm=isch&sa=X&ved=0ahUKEwii8Zu7t4veAhVQglwKHZbtBlsQ_AUIDigB&biw=1366&bih=632

Jenny Saville portraits

https://www.google.com/search?biw=1366&bih=632&tbm=isch&sa=1&ei=yRjGW-OHCIKugQb55774BA&q=jenny+saville+portraits&oq=Jenny+Saville&gs_l=img.1.1.0j0i67k1j0l8.18724.20763.0.22583.2.2.0.0.0.0.203.345.0j1j1.2.0….0…1c.1.64.img..0.2.343…0i30k1.0.MYLOE_aaKZI#imgrc=Jpgj5rHQuo8PIM:

Nick Lepard’s paintings

http://koikoikoi.com/2010/05/nick-lepards-paintings/

Yan Pei Ming

https://www.google.com/search?q=yan+pei+ming&source=lnms&tbm=isch&sa=X&ved=0ahUKEwjyxOnj_5zeAhXRfFAKHe6gDPEQ_AUIDigB&biw=1366&bih=632#imgrc=_

Joan Eardley

https://www.studiointernational.com/index.php/joan-eardley-a-sense-of-place-review-national-galleries-scotland

Assignment 5 – Hornsey Road Fire Fighters

After Grenfell_web

Hornsey Road Fire Fighters

Daily Life

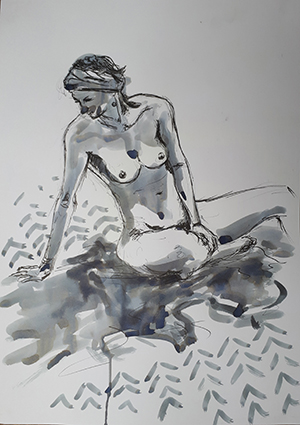
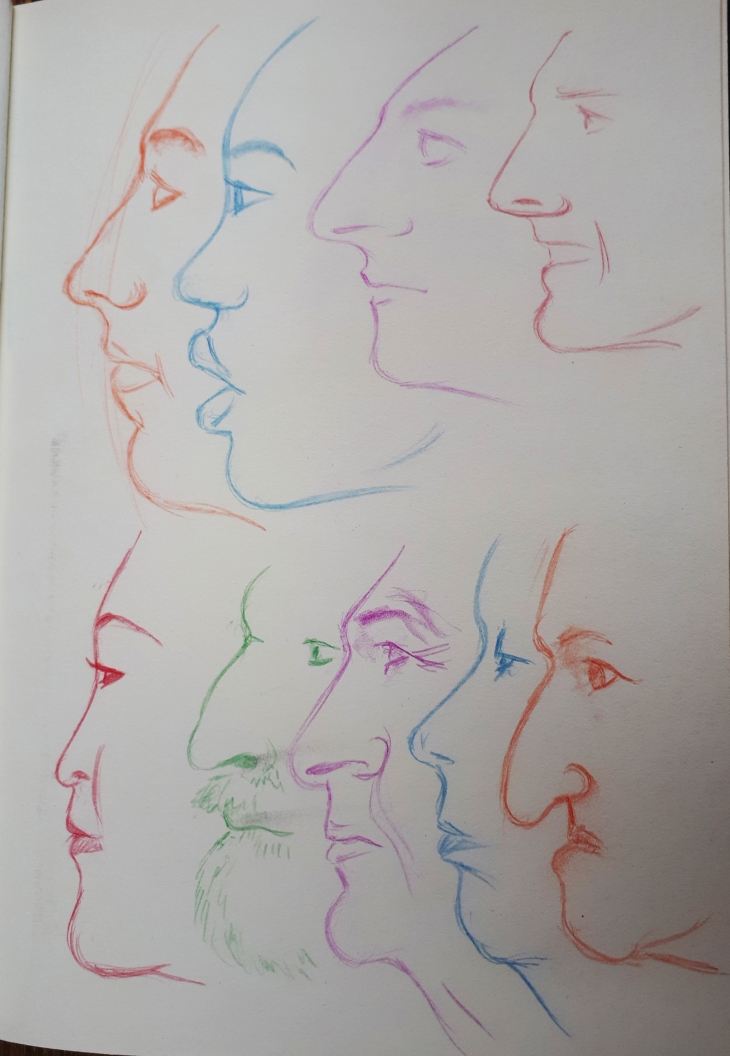
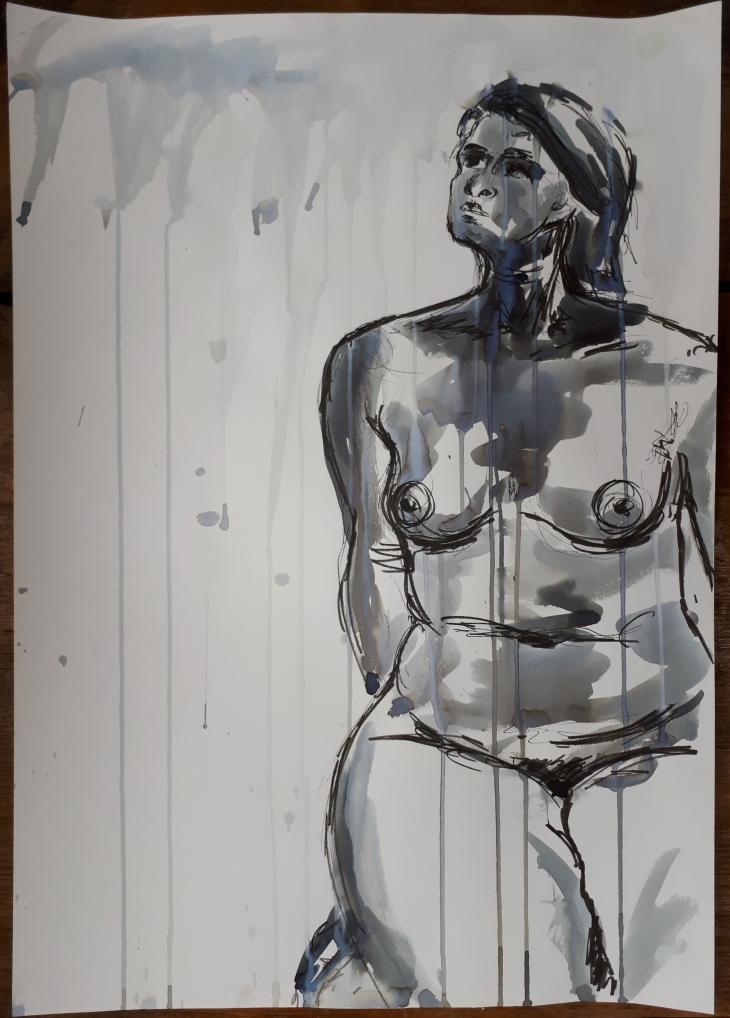
For this series I decided to work in a limited palette; I guided my composition in blue Col-erase pencil first, sometimes I had to make alterations to my drawing or combine two photographs from the photographic reference to tell the story that I wanted in my composition.

I then drew up the work in Faber Castelle PITT pens mainly the (S)small, (M)medium, (C)Calligraphy and (B)Brush nibs, often drawing up a number at a time and working through the set many times to work them up to their finished state. Having completed my pen work I next wet the whole page with a sponge and clean water to dampen the paper in order to add the ink top layer. To keep the feeling of the composition as sketch-like as possible I wanted to apply the ink quickly so that it ran and blended over the image and only had a hard line when I wanted it to. The Black Quink Ink I chose to use has hints of blues in it and id bleachable, turning the black area that has had a dilute solution of bleach an ochre/sandy shade of varying strengths.

Having applied the Black Quink Ink in varying strengths of shade across the whole image to define the environment I built up tonal ranges in the figures and foregrounds. The main colours that the Fire Fighters wear are Dark Blue and Red, with yellow present on their official call-out uniforms and truck. So to give the compositions I used some spot colours of mainly red and yellow to bring out some focal points to the image. I chose to use an Acrylic ink as the colour sits more physically on the surface of the paper which I felt appropriate and for the look that I wanted. Occasionally I needed to use a mix of the red and yellow to give me an orange, and the blue and yellow for a green. When the red or yellow spot colour was limited the image had less impact, another colour would bring the scene to life, so by adding inks more soaked into the paper and subtler (which was better to use a bleachable D PH Martins ink or really watered down acrylic); blue was used more to depict light and reflection, green was laid down more flat a solid colour depicting a solid object.

I think the limited use of colours really ties all the series together to show the depiction of daily life, the monochrome feel and spot colour leaves a lot of the image to the imagination so you want to look more into the picture. There is also an element of seeing things in black and white or monochrome (ie; sepia) that has a sense of nostalgia and a record of the past that suits this medium of storytelling.

On Parade in official uniform

For this series I felt it important to present the individual as well as the drawing, a more solid medium in bold colours would give the individual a presence and officidum. I had been working with oil pastels quite a lot in my life drawing classes and considered that this felt like a good medium to convey the look that was in my head; solid, correct but not photo-real, conscious and sometimes bold in the colour palette and strong and proud in front of a hint of a background which I would complement the oil pastel with a chalk pastel or Conte stick to add suggestions to aspects of the background.

The first Fire Fighters that I chose to draw were the only two female crew; 2018 being the year of the women and all that! Having completed these two portraits I went on to draw some other of the crew members. I couldn’t do all of them, so I just decided to take a select a few photographs that I felt would be suitable for a series. I had a few that showed the Fire Fighter in the act of doing something, putting on a helmet and taking the register, I felt that a mix of these different poses would make the viewer more engaged with the subject if they could relate to them as people, not just to attention.

The paper that I decided to work on is a rag paper which is approximately 78 x 57cm, the brown flecks in the paper are bagasse (Sugar cane) or other fibers and the paper feels like it has a sort of gum in it, it has a good surface for the oil pastes, a tooth, but not too much, an organic surface with natural edges. I used a half sheet for the portraits and 3 quarters of a sheet for one work. When I went back to get some more paper I discovered that they were out of stock and then later that they are discontinuing the line! I found a white rag paper with a similar feel to the surface, but not the flecks colour of the original choice, typical! I will just have to do the remaining ones on white!

I then got asked if I would do a group drawing of Green Watch, which would fit nicely on a full sheet of paper. Then slowly as I was doing it I realised that I would have to do one of each of the Watches now, the project would not be complete if any watch was missing and I didn’t want to appear bias in any way!! Then when I returned to each watch to photograph them in uniform in a line-up the other Watches have 5-7 members, I would have to get more white rag paper and stick two pieces together.


Daily Life Images

All the Daily Life images are done on 200gsm A2 Cartridge with Quink Ink, Diluted Bleach, FW Daler Rowney Acrylic Inks and Dr PH Martin inks.

testng the hose_web

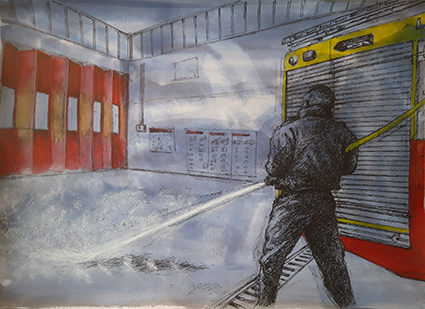
Testing the hose (Red Watch)

This was the first sketch that I did for this series. I was getting to grips with my subject and my drawing methods. I made some mistakes with the size of the Truck, but succeeded to leave them in as I think that not only do they tell the story of my drawing, but add to the sketchy look. The spot colour helps keep the eye away from the mistakes. The red was also applied very selectively on the doors to help create areas of light and shade, and the water spray is done in a soft white pastel that sits on top pf the background wash to depict the spray.

testing the mask_web

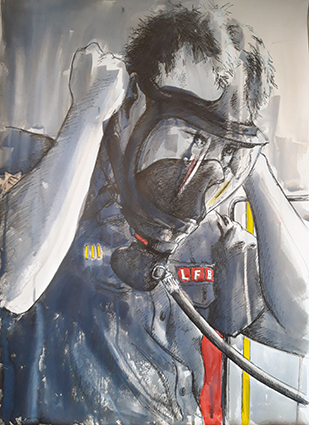
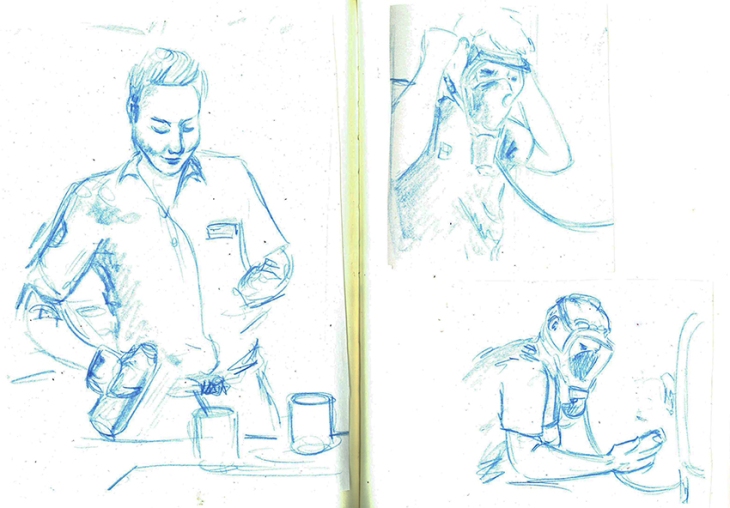
Testing the Mask (White Watch)

It took me two attempts to get the proportions right on this sketch, the mask was really dark in my reference and I struggled to make out its form. There is not much colour in this drawing, however I think it is one of the stronger compositions. The soft reflections in the glass on the mask really help , and there is a focus about subject testing the equipment.

testing the pressure_web

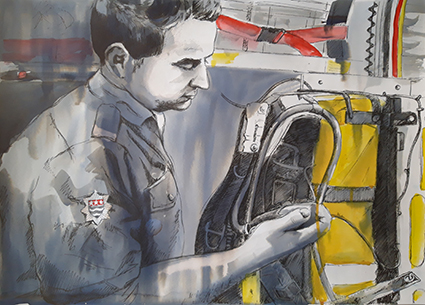
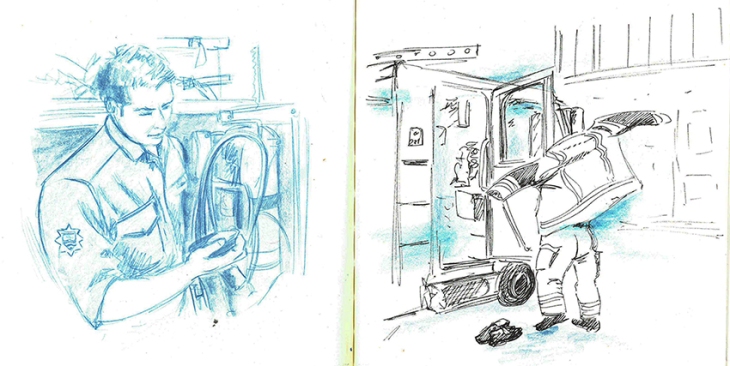
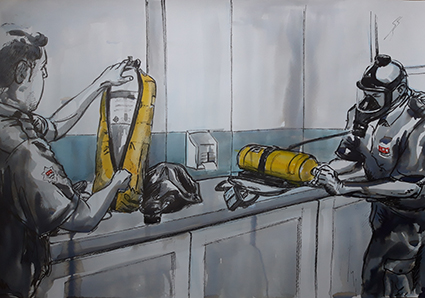
Testing the Pressure (Red Watch)

I like he intensity of the focus here, the equipment being functioning properly can be a matter of life and death. This has to be done every change of shift. There is just enough a hint of the background to imply that it is the truck. I used a little bleach in this one to draw some highlight to the arm, and a little on the face to imply the skin.

making tea_web

Making Tea (Red Watch)

Fire Fighters make a lot of tea, a lot more than they get to drink tho! I wanted to capture that ordinary function of making some tea and just having a chat whilst doing it. I am happy with the composition, however there is not much spot colour, just a bit of T-shirt and some buttons on the coffee machine. It is here that I realised that I would need to introduce  some additional colour. A pale wash of blue would indicate shine on the stainless steel surface and the blue and yellow ink made a nice green for the milk lid, this also gives an importance to the humble milk bottle that is so integral to the ritual of tea making.

the mess table_web

The Mess Table (White Watch)

Having made food for the whole crew Lexi sits down to eat with her Watch, I go and literally 2 minutes later when I was up the road, the truck drove past sirens blaring. I wanted to capture a rare moment when they actually all got to sit down and eat together. I wanted to capture the starkness of the Mess room. The wooden tables were emphasised better with some bleaching turning the black ink sandy colour to represent the wood, it also softened the image and drew you into the table more. The head of the female Fire Fighter seems a bit big to me, but I live with my mistakes!!

checking the map_web

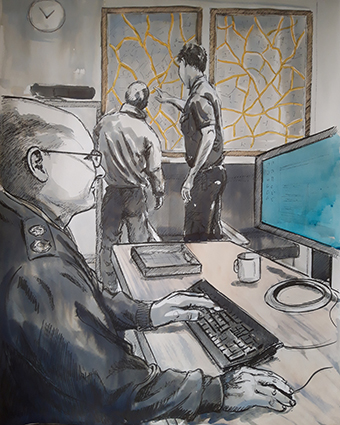
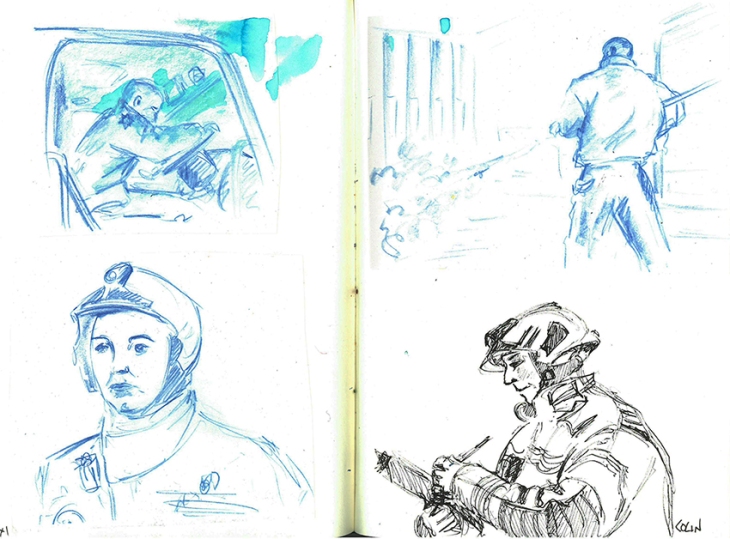
Checking the Map (Red Watch)

This is a compiled composition; I wanted to capture the Sargent doing his work on the computer while the Fire Fighters work out where they are headed by studying the large map of the area. This composition has some depth as the scale helps draw the viewer through to the map, the yellow on the roads was not enough to pull the picture together, then as I looked at the computer screen I realised that the Microsoft Blue light coming from the screen held the answer. You don’t really see it, it just draws you past it, but the figure is intently looking into it!

call out_web

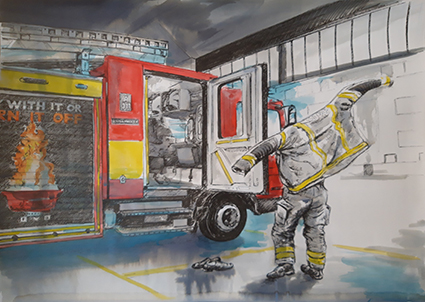
The Call Out (White Watch)

This was the sketch the made me realise that I would need to use other colours other than just red and yellow! I needed a blue to show the siren lights and to mix the red and yellow to show the flames on the graphics on the side of the truck. I felt important to show this composition into the story, introducing the truck, the act of quickly putting on the kit, leaving the day shoes ready to get into the open door and drive off into the light outside. By putting the coloured ink over the top of the tonal Quink Ink I can give some idea of texture and shade.

Mobilize Mobilize lettering_web

Mobilize Mobilize (Red Watch)

I now wanted to show what the station looked like once the crew had gone out on call, any food was left half eaten, I was warned that every time they cooked together the meal was interrupted by a call-out! This was the only sketch that I felt warranted text, I wanted to convey what was said over the tannoy. It is surprisingly quiet as an alert, not a loud siren that would make you jump out of your skin! For this reason I have done the lettering sketchy and not solid. A bit of bleach on the bun gives a feel for the bread while the beans required some orange mix. The sketch came to life when I added the blue on the stainless steel and then the secondary focus on the First Aid Kit, the green object giving another point of interest.
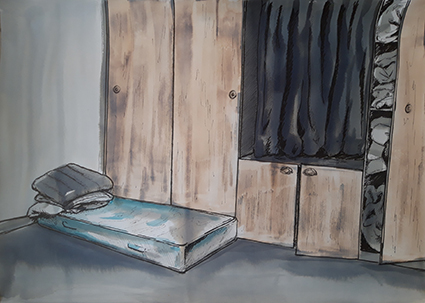
night watch_web

Night Watch

I was shown around and delighted to see the sleeping quarters used by the Night Watch. The mattresses were supposed to be put away, however fortunately for me this one was still out. It felt very basic and 1950’s in the feel of the built-in wardrobes that stored the sleeping bags and mattresses. The only real colour was a bit of blue in the pattern on the mattress, so I added colour in this sketch by bleaching back the doors to represent the wood. The lone small mattress looked quite bleak in the corner, so I wanted to keep an element of bleakness to this drawing.

changing kit_web

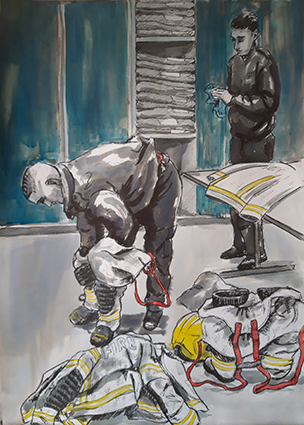
Sorting Kit (White Watch)

Having come back from a Call-Out the Fire Fighter has to change his soiled uniform for a new one. New uniforms were introduces a few months ago, now every time they get a bit dirty or contaminated they are sent off for either cleaning or disposal. New kit is stored in plastic bags in the lockers behind. When I painted these blue it was too dark and I forgot that it did not bleach, the Quink Ink behind it did bleach a bit and it left the doors looking quite streaky and a little busy, but I have to live with my mistakes! I really like the way they have to put their trousers over their boots to enable quick dressing and get away.  In this sketch I wanted to show the way that they do this, the way that the clean their kit, and record and unwrap the stiff pristine new uniform.

no pressure_web

No Pressure, Changing the air tanks (Blue Watch)

This is what the daily checks are for. The tank was not up to pressure and had to be changed for a new one. There is a side room where all the spare tanks are kept, it was stark and lacking any colour except for a pale blue/grey stripe around the wall which I had to use a very dilute wash over the dilute Quink Ink, the yellow covers for the tanks and the embalms on their uniforms being the only other spot colour.

sargent carrying kit_web

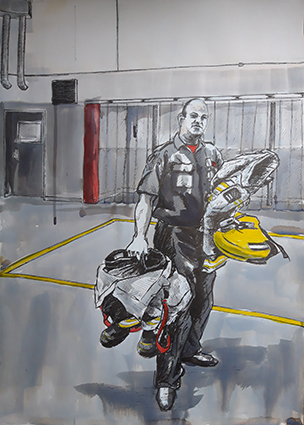
Sargent Carrying Kit (Blue Watch)

I wanted to show just how bulky the kit is that they have to carry, this shot of the Sargent, denoted by the black and white stripe on his helmet. This view, which I used a bit of artistic licence in the background, also shows the Fire Poles behind the clear plastic blinds, I don’t think they are used that much, but they are an integral part of our stereo typical idea of a Fire Station. I really like the minimal spot colour in this sketch, and the deliberate drips add to the textural interest.

checking the hose_web

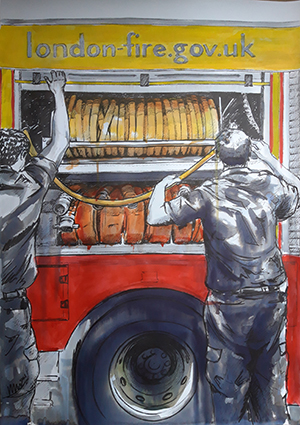
Checking the Hose (Blue Watch)

The hose is obviously an integural part of the truck; the automatic rotation to coil the hose needs to be checked, sometimes if not returned correctly the hose can become jammed. There are two sorts of hoses, ridged yellow ones and more flexible red ones. When the wound hose is correctly coiled, the shutter door is pulled down. This sketch is the one that I have used the most colour in so far, varying shades of orange are used for the hoses flanked by the red and yellow of the Truck. I kept it qiute rough, drippy and sketchy to keep some textural interest, I didn’t want the colour to be too neat and become to tight and dead visually.

the truck_web

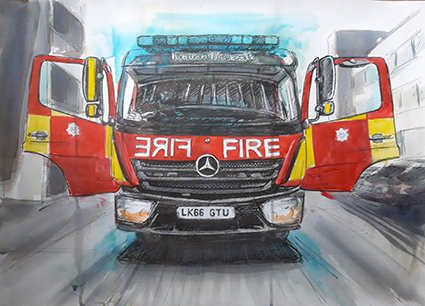
The Truck (Blue Watch)

Had to draw the Truck, it is a part of the Family! I wanted the background visible, but a bit softer as if bleached out by the bright sun. The Truck, ready and waiting for a Call-Out sits waiting like a butterfly ready to take off and fly. The crew run regular checks on the siren lights to ensure that they are working, giving the Truck a sort of blue halo! I like that the background looking as if it is whizzing past even though the Truck is stationary, it gives it a sense of life.

After Grenfell

After Grenfell Sketch_web

For a culmulation of this series of daily life, testing and training I was given a photograph taken by one of the Fire fighters of Red Watch when they had attended the fire at Grenfell Tower in North Kensington, it was such an emotive image that I felt it would make a fantastic final image for this series, this is what all the work, training and preparation is for.

After Grenfell_web

Once I had added the spot colour on the truck and clothing this artwork really came to life. Tammy, on the left hand side of the picture is still in full uniform, the old dark blue wear that was replaced towards the end of 2018. Getting the expressions right was critical to this image, the viewer questions what they are looking at which is only given away by their demeana and the title. The loose almost abstract ink work conveys the exhaustion and soot, the colour gives the Fire Truck context.

Officially in Uniform

These portraits are a celebration of the men and Women who serve at Hornsey Road Fire Station
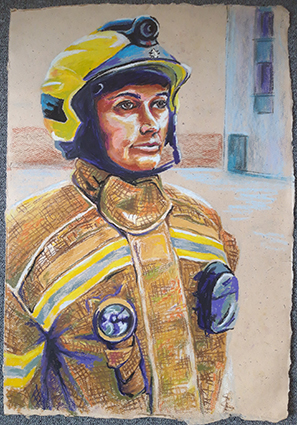
lexi_web

Lexi

I wanted to start my oil pastel drawings by drawing the female Fire Fighters first as 2018 was the year of the women. Lexi was so hospitable and helpful showing me around I wanted to do her first. This is the first time I would work out how to represent the uniforms and tones. This part of my project enables me to explore tone and colour while trying to keep a freshness about my mark making, I had to work out some mark making and methods of application that I could apply to this and future portraits.

tammy_web

Tammy

I got some new oil pastels so that I had some differing colours and density of oil pastels, some harder (the Daler Rowney ones) some medium hardness (Neopastels) and softer ones (Selinner) I also got some cheap ones (Giotto) to add to my tonal selection. This portrait is quite official in Parade pose, but it does emanate a strength and defiance of character.
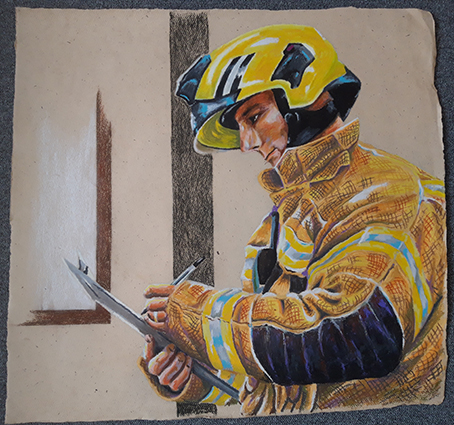
colin_web

Colin

I wanted to illustrate another aspect of Parade, so I drew Colin checking his crew with a clipboard. Compositionally this needed to be larger than half a sheet so I used about three quarters of a sheet which looked most comfortable. The minimum use of colour done in Conte pastel just indicates his surroundings rather than drawing too much in.
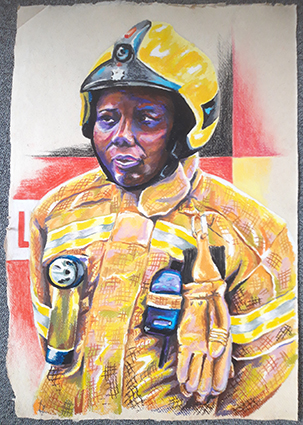
brian_web

Brian

Here I wanted to try rendering a different colour skin tone, I had seen Brian standing in on an extra Watch and felt his dedication needed to be recognised! This was a good exercise to see how far I could push the colour tones to bring out his character.

reece_web

Reece

When I went in to photograph Green Watch Reece was particularly helpful and had a really outgoing character, so I felt he would be a good subject for a portrait, slightly cheeky and always smiling! It was also this Watches’ idea that they would like a group drawing, what had I got myself into?
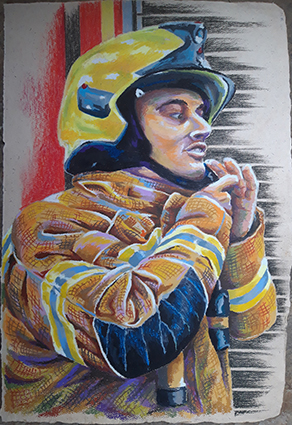
unknown_web

Dan

I wanted to capture this portrait in the act of dressing in uniform putting on the helmet as drawing someone in mid movement can create an interesting composition. As with the other portraits, I laid out my composition in blue Col-erase pencil which I then rubbed out lighter with a putty rubber before building up firstly the uniform, secondly the face, then finally the dark areas on the helmet and clothing and the cross hatching over the top of the uniform.

Group drawings of each Watch

green watch_web

Green Watch

A single comment from one of the crew inspired this drawing, he wanted one of the whole watch so that he could put on the inside of his locker. Drawing the crew smaller was more difficult as representing detail in oil pastel at this size is not as easy as it is on a bigger scale. I had to add uniform trousers to this drawing as they had posed only in jackets, I got this reference from pictures of White Watch. I wanted to capture them official, but a bit relaxed as I felt that this would give each one an identity and personality easier than if they were stood fully to attention. All these group drawings are done on A1 sheets stuck together to make the appropriate landscape length.
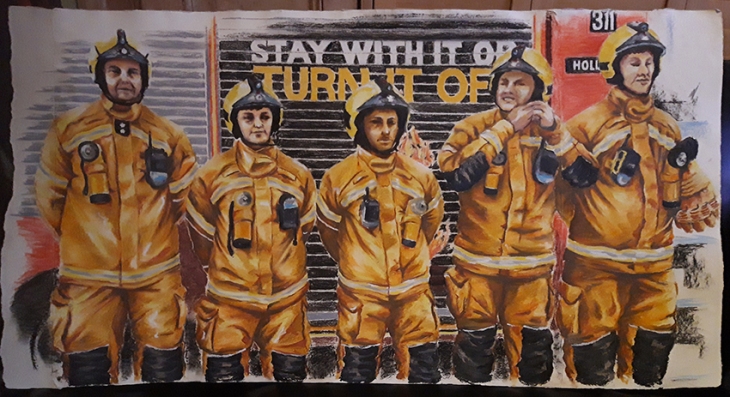
Red Watch_web

Red Watch

Once I had done Green Watch I realised that I had to do all the Watches, it would not be fair to just do one, I had to do all four watches. When depicting Red Watch I felt it added an extra level of interest to the scene if one of the crew was doing up his helmet. By the time I started this drawing I had shown some of the drawings to the Curator of Islington Museum who indicated that they would be interested in having a future exhibition around the Fire Fighters to celebrate their work, this also made me realise that I could work on a slightly bigger scale by sticking sheets of paper together to make a landscape and fit all the crew on rather than making the figures even smaller. I intend to show them clipped and unframed as they are on 350gsm cotton rag paper which is fairly rigid. The bagassee and Gunny paper that I had been working on had been discontinued, so I had to find an alternative.  I did prefer the brown off white background, but I could not find suitable alternative paper in brown, so I had to suffice with a white background.
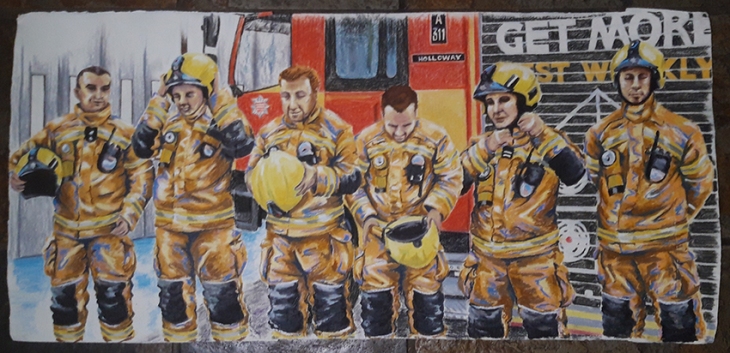
Blue Watch_web

Blue Watch

For green watch I had used a green base to the uniforms, for Red Watch an orange tone, then for Blue watch I added a blue highlight and a white highlight for White Watch. I had liked the crew member putting on the helmet in the previous drawing, so in this group image I wanted to show the process of putting on the helmet. I had to compile this image from a collection of photographic reference, I like the wave line that is created through the image of the different stages of putting on their helmets. I am not 100% satisfied with my depiction of the faces, maybe sometimes the heads are a bit big, but the proportions were challenging when you place a human figure in an over size uniform! I could not change it, so I had to go with the result that I created, they do all have individual characters, and I think that the aspect that I have depicted the truck in does add an additional interest as it also includes the station doors implying the way out when opened. With 6 characters in the crew, the paper had to be a bit linger. I wanted to keep the heads not on a paper join seam, so I had to add additional paper to each side to accommodate the composition.
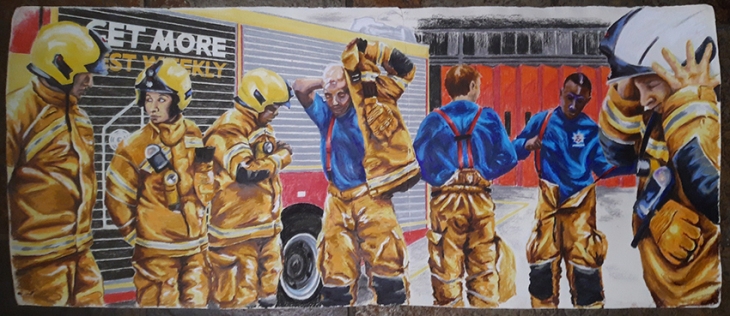
White Watch_web

White Watch

Finally I had White watch to draw. Some of the crew were a bit drawing shy, but they did all dress in uniform for me as I photographed them. I had in mind that I wanted to depict them getting dressed in uniform to show the layers and sequence of dressing. This image is the longest as a full maximum crew of seven were to be depicted. This is a complete compilation from many different photo’s and was the most difficult of all of them to complete. I chose to show a different view of the truck and the station so that I had a full gamut  of scenes. this is my favourite of all the group portraits, I think it has the most movement and storytelling in it and is therefore the most interesting, especially as it includes a different aspect of the station back doors as well.

In all the portraits I have used Conte sticks to depict the backgrounds. I had to use the edge of a sheet of paper to get the straight lines, and although I was depicting the truck and the environment I was careful not to do so fully so as to leave something to the imagination. I like the contrast in technique as it gives the eye two aspects to look at that do not fight each other.

I may have done more images than is strictly required for this part of the course, but I felt that I had a story to tell, and that story could not have to be told in few images. I needed a bit of extra time to finish all the drawings as the big ones took a couple of days to do in total at least as it could take some time to get the composition right to start with and I have been working full time throughout December and January, although I did have some well needed time off over Christmas that I put to good use with my drawings.

I have really enjoyed this project and have relished getting into producing a series of works that have evolved and developed over the period of time that I was executing them. Working in two styles gave me scope to tell two parallel stories that depicted the sides that you see and don’t see publically. I hope that I have achieved my goal of celebrating the work of Hornsey Road Fire Fighters, and I have to thank them for their generosity in accommodating me doing this project.


Part 4; The figure and the head – Life Drawing classes 13

Holborn and Covent Garden Life Drawing Class 13 September 2018. Models Elise and James.

In the spirit of trying out new classes, I met a friend at the class that she had been attending in Covent Garden. I was fortunate enough to get an easel as I like to work standing up and with various materials that would be difficult if I had a board on my lap.

Pose 8 – 45 mins

Sketch 84_20180914_web

This final pose is on A2 pre-prepared collaged cartridge with news articles from the Saturday Telegraph 18th August 2018, It is drawn in Quin ink, conte stick and Rembrandt pastel. This is a style that I have been working on for a while and it is beginning to grow as a method, I am quite pleased with this sketch.

Pose 7 – 20 mins

Sketch 83_20180914_web

This 20 min pose is on A2 cartridge done in Quink ink and Faber Castelle PITT Pens. This style suits this length of pose, roughing outn a thin M pen then adding a thicker line with either a C or B head.

Pose 6 – 20 mins

Sketch 82_20180914_web

This 20 min pose is on A2 cartridge done in Quink ink and Faber Castelle PITT Pens. adding the pattern of the parquet floor gives the sketch a new level of interest as do the drip lines that I quite like to add.

I decided to do all my warm up poses on the 22×17″ wallpaper, thisway I can rough the pose out quickly in a light wax crayon, I favour light orange, then I can define the line later at home with a darker colour or black and add some colour with poster paints and texture with wax crayons or wax candle. I probably spent about 10-15 mins on each sketch at home to finish them

Pose 5 – 2 mins

Sketch 81_20180914_web

I have begun to realise that it is quite fun to put the poses into a different environment when I work them up at home, the pole made me think of punting that they could be riding on floats like blood cells down a river/vein.

Pose 4 – 2 mins

Sketch 80_20180914_web

The close-up bold sketches work well with a simple background, it reminds me of pyjamas!

Pose 3 – 2 mins

Sketch 79_20180914_web

And adding colour to the figure makes the drawing look more complete, especially set against a textured background.

Pose 2 – 2 mins

Sketch 78_20180914_web

I think it also works well putting the figures into a three dimensional space, especially including shadows.

Pose 1 – 2 mins

Sketch 77_20180914_web

This pose reminded me of a James Bond Poster, the circles are formed by with the wax candle.

It was interesting going to another class, and the models were very good. I am quite enjoying developing the drawings further at home.

Part 4: Project 6; Exercise 1, Facial features

Part 4: Project 6; the head, Exercise 1 – Facial features

Look at people (including yourself) in magazines, on TV and elsewhere and study the individual features. Practice drawing these in your sketchbook, a couple of pages per feature.

When you feel confident draw an entire head. Do not erase your mistakes.

Threasa May

For this project I combined the exercise with another project that I had to complete outside of the course. My brief was to do a portrait of Threasa May. I sketched a couple ideas in my sketchbook, and although one was favoured over the other, I decided to do both anyway! For this drawing I collaged articles that I had collected about the fire at Grenfell Tower and a few other articles that featured Mrs May. I wanted to create a discussion about the disaster and the manner in which she reacted, which in my opinion was not sympathetic to the victims. Done in monotone I wanted to bring the dirty sooty feel of the burnt out building into the portrait and have bits of the newspaper cuttings peeking through in a ghostly manner.

20180809_175346

I have not used a rubber at all on this exercise, however I have worked over it quite a lot. I think there are still aspects of the face that are not quite right notably subtally, the shape of the face and the mouth, but they are close and I think it is recognizable as Threasa May herself! I actually think that the overworking adds to the portrait and additional drawing of some burnt out windows in the background looming towards her and the fire fighter over her left shoulder all add to the ominous feel to the overall composition. I also included a chain around her neck, something she has often worn to signify a sort of imposed constraint of her personality, being chained to a position where she does not step out of line, even compassionately in this case.

The styles that I have drawn from for this image are those of William Kentridge and possibly a bit from Tactia Dean with her stunning black and white work.

Threasa May preliminary sketches

May comp

I did some preliminary sketches for this drawing as well as some other drawings to look at some different expressions, facial features and body positions.

Threasa May Expression sketches

Sketch expressions 01

Sketch expressions 02

I found her face really expressive and the individual facial features very interesting. The eyes have heavy circles below them and dark thin shadows across the top lid. Her chin is not symmetrical, the left hand side of the chin is drawn in and flatter, muscles below the skin pull in more than the right. The lines running from the nose edge to the mouth have indents higher than the mouth, and the neck tapers directly from the back of the chin.

Facial features studies – The Mouth

20180807_144113

With the mouth the shading and often the lack of line I think is key to defining the shape and amount of protrusion of the lips. The teeth are also an integral part of the mouth and the amount that they show can define one particular expression from another in a very subtle way, as can the shape the lips make through varying emotions and speech.

Facial features studies – The Nose

20180807_144142

Noses vary not only in their profile, but with the width of the base and tip and not only the shape of the nostrils, but whether they can be viewed when the face is seen front on or not.

Facial features studies – The Eyes

20180807_144153

Eyes are also really expressive, the direction that they look, the amount that the lid is raised or lowered and also the age of the person. The skin around the eye becomes looser as the story of someones life is drawn in the wrinkles that form around the eye and the eyelid.

Facial features studies – The Chin

20180807_144203

The chin also varies significantly in its shape, length and width, as well as the weight of the person. A double chin changes the shape of the face and the addition of facial hair also changes the character of the person. Facial hair also varies dramatically, from a small tuft to a beard that is bigger than the visible face of the owner!

Facial features studies – The profile

20180809_093959

I was also particularly interested in different profiles that occur between men and women, different ages and ethnic origins; the flatter Asian face, the protruding chin, the receding chin, hooked noses and sloping foreheads have an endless combination of possibilities. It has been really interesting to look at the face in such detail and I look forward to applying these observations to my future work.

Pictorial reference

image

Part 4; The figure and the head – Life Drawing classes 10

Holloway Arts Center Life Drawing Classes – 08 August 2018

Sketch 6 – 1 hour

Sketch 65_20180809

I had really enjoyed this session and for the final pose I chose to work on my pre prepared paper with the news articles from Saturday Telegraph 29th July 2017. Done on a landscape format it suited this pose. Having used this technique a few times now, I think this is my most successful so far. The positioning of the text and the composition of the figure all sits quite comfortably. The patterning detail of the quilt actually adds another dimension to the drawing that along with the darkening of the background really pulled the whole composition together. This drawing is A2 done in Conte Pastel, then Quink ink and soft pastel finishing with a soft pastel smudged black line.

Sketch 5 – 20 mins

Sketch 64_20180809

This drawing is done on 51x 65cm watercolour paper prepared with gesso primer and with large oil pastels and spirit. I must learn to put the black on after I have smudged all the other colour with the spirit and a rag first otherwise it bleeds into the image where you don’t want it to, however the time constraints on this pose meant that I did not have time to put the background in before the 20 mins was up and had to work on it after the pose was finished. This style/technique I have also practiced a few times now and I think this example is beginning to show where it can go. Although it is quick to work with, 20 mins is tight, I would like to have 30-40 mins for this technique.

Sketch 4 – 15 mins

Sketch 63_20180809

For this 15 min sketch on A2 Cartridge I used small oil pastels. I did not have time to finish this during the pose, so I smudged the oil pastel with spirit and rag when I got home and added the patterning in the background and on the yellow cloth which added a much fuller and more designed element to the drawing as a whole.

Sketch 3 – 10 mins

Sketch 62_20180809

This drawing is done on A2 cartridge with Fabercastelle PITT pens, calligraphy and brush tips and Quink ink. I considered the pose before I started, she was sitting very symetrically and face on to me, I refrained from putting her in the centre of the page and moved her overto the right, I think this made for a much more interesting composition. I added the watered down in in the last minute or so which I think really pulled the drawing together. I am happy with the way this technique is progressing and was pleased that the Pitt pens did not bleed too much with the water over them.

Sketch 2 – 5 mins

Sketch 61_20180809

This sketch is done with graphite block in my A3 sketchbook. I wanted to concentrate on what I saw as the most interesting aspect of the pose and how to make it interesting with such bold lines. This is a warm-up exercise and so not necessarily the best technically!

Sketch 1 – 2 x 5 minute poses

Sketch 60_20180809

On thin A2 Cartridge these 5 min warm-up sketches are done in Conte sticks. they serve their purpose as warm-up drawings!!

I really enjoyed this session as I feel that the various techniques that I have been developing are maturing and I am looking forward to exploring them further.

Project 2 , Exercise 1; Quick Studies

Part 4: Project 2 Proportion; Exercise 1

Draw your model in a comfortable position. Make some rapid sketches and concentrate on what is essential. Then do some larger 10 minute drawings. Do some more drawings changing position and drawing medium.

Sketch 1

Emma 1

This is my first 5 minute A4 sketch in waxy chinagraph pencil, my first warm-up for this exercise. Chinagraph is quite bold to sketch with, it does not smudge. It feels a litle empty and basic so next I moved on to conte stick.

Sketch 2

Emma 2

I like this relaxed position and am happy with the proportions. I do have a habit of drawing a little big, it is not intentional, but some of my drawing always ends up going off the page. I am not unhappy with the composition though! Again on A4 this is a 5 minute sketch.

Sketch 3

Emma 3

This sketch is also A4 and done in a deep red wax pastel and took 5 mins. The composition is not so successful, she is a bit bunched to the left, however, the bold textural mark making has potential.

Sketch 4

Emma 4

For this 5 minute sketch I used a brush and Quink Ink. The paper soaked the ink really quickly so I had to re-load my brush frequently. I like the bold mark making and the hint of tone and texture, and I actually really like the pose and the freedom of using the brush with a fluid medium.

Sketch 5

Emma 5

For this final 5 minute sketch again on A4 I used charcoal, the grain of the cartridge bit into the charcoal quite robustly giving me a very strong defined line. I could have had a bit more fore-shortening with the feet, but am happy with the composition. She is floating a bit, but there are just enough background lines to delineate the sofa on which she is reclining.

Sketch 6

Emma 6

I wanted to experiment a bit so next I used soft pastel on black A2 paper. This is a very un-forgiving set of medium to work in, but the result is quite striking. I think the use of the black pastel on black actually adds a depth that was lacking without it. It is quite sketchy, and I am sure bolder cleaner lines would have made for a stronger drawing, but it is one of my favourite drawings from this session.

Sketch 7

Emma 7

For this 10-15 minute sketch (I forgot to time myself!) I used A3 cartridge paper with Carbothello pencils. I think the addition of some colour really livens up the drawing and I am happy that I actually managed to get the whole figure on the page!! The pose its self has some nice lines and foreshortening of the legs.

Sketch 8

Emma 9

This final sketch I did in Faber Castelle PITT brush pen and medium nib pen from a photograph as my model had had to go. I found that there was an element of urgency that was removed from when drawing from a live model and I could take my time over constructing my drawing. This sketch was done in my A3 Sketchbook and took about 40 minutes. I like the contrast of the two different types of pen used here.

Reference photographs

Emma

Exercise 3; A limited palette study

Part 3: Project 4 Perspective; Exercise 3

Using your sketches from the exercise select a drawing to develop in colour.

Begin with a horizontal line that defines your eye level. Use a limited palette for this exercise, no more than three colours. Use conte pencils, coloured pencils or ink and work on smooth or rough paper.

Crouch End Hornsey Town Hall Arts Centre

I chose this view of the Arts Centre (built 1933-5) as I feel that it is the other iconic view in Crouch end and I really like the 1930’s modernistic architecture with the small green in front of it and the surrounding buildings that reflect the style of the Town Hall building. I went back to the Town Centre to take some additional photographs and to do a rough sketch to map out my intended composition. I was really pleased that I took the time to do this as I noticed manymore details about the people and the look and feel of the area than I had remembered.

I did two versions of the scene firstly using conte sticks and secondly using pen and ink.

Version 2. Crouch End Hornsey Town Hall Arts Centre – Pen and ink

Crouch End Arts Centre HTH pen and ink

I was not completely happy with my first version so I decided to do a version in pen and ink that reflected the pen and ink version that I did in the previous exercise. I think the proportions of this drawing are more accurate and describe the whole area in greater detail than the conte version.

I began as instructed by drawing the strongest verticals of my primary focus building, i.e. the tower of the Arts Centre, then I built up the diagonal perspective lines that made up all the other angles of the buildings. Once I had lightly sketched out the whole scene in pencil, I then began to draw in the details in pen using the black calligraphy ink. This sketch took about two days, about the same as the previous exercise. I chose to do it on the same panoramic format as the previous exercise as I felt that it suited the scene well and that they would make a good pair. The first attempt (below) felt too squashed. This version is done on a lengthwise half A1 sheet of 300gsm cartridge which I think gives the scene a certain amount of bredth and majesty.

I did all the black line work first then selected a Burnt Sienna Ecoline watercolour ink to draw in the detail of the building. This ink is not fast so did spread and loose its definition when I used a watered down wash of the same ink over the top to give some solidity to the buildings. I also tried to capture some sense of the hazy sunny day that cast some soft shadows and lit the faciers of the brick work in certain areas. I did return to darken certain areas a few times after photographing it as I felt that the image as a whole was lacking. It definitely improved once I had indicated some shadow under the tree, darkened the top part of the left hand building and made the lower right hand windows darker. The Burnt Sienna actually turned out brighter than I thought it would. I had tested some samples in my sketchbook which indicated a darker more reddish tone. This is a lesson in that different papers give different results, my cartridge reveals the ink in a much more orange hue. It’s a but of an un-subtle colour, but it does definately give the image a bright zingy feel. Thankfully i decided not to use the Burnt orange that I bought and tested in my sketchbook in the shop, it would have looked irradiated!!

Version 1. Crouch End Hornsey Town Hall Arts Centre – Conte sticks

Crouch End Arts Centre conte

This was the first version I did of this scene on A2 cartridge paper following the brief to build up the tonal values by gradually adding more pressure to the mark making. I found that I seem to have condensed the scene to fit it onto the paper as I wanted to include at least some indication of  surrounding buildings that stand either side of the green. I still felt that I wanted to see more of these buildings which is another of the reasons that I decided to do an additional version in pen and ink in a panorama. The medium of Conte sticks also encouraged me to make bolder and quicker mark making which gave the image a muck more sketchy feel. I think it lacks convincing light and shade, I did add some white pastel and some thick black ink lines in order to increase the tonal range, but I still think the image as a whole is a bit flat even though the bolder mark making does give it a bit of energy.

It was really interesting to do both versions to see just how different the two approaches were. The pen and ink version really slows the whole drawing process down and therefore encourages more detail. I had to work hard to build up the depth of colour in the darker areas and sensitively with the Burnt Sienna ink adding a lot of water to it to get some very pale areas that would enable the darker non watered down areas of wash to give a sense of three dimensionality and light and shade.

I have also again drawn almost all the people in the scene on their phones, which was actually not so far from the truth, but they do give the whole scene some meaning and life, especially in the cafe area on the left, which is always busy, especially in the summer. I also wanted to include the spikey plant in the foreground otherwise the expanse of grass may have looked very flat, I think it does add an element of depth and distance to the composition.

Reference Sketch

20180415_162859

Photographic reference

Crouch End Arts centre comp

Exercise 2; Study of a townscape using line

Part 3: Project 5 Townscapes; Exercise 2

Use two sketchbook pages to make a preliminary drawing for this study. Establish your primary shapes and objects that you think necessary to make this drawing interesting and unexpected. Complete the study in pen and ink or black drawing pen or fine brush pen.

Crouch End, London N8

Crouch End Town Centre Pen and Ink

Crouch End Town Centre – Pen and Ink version (840 x 297mm)

I had done the study for this exercise in my A3 landscape sketchbook, a panorama done fairly quickly in a Conte pencil. The weather was warmer than it had been for days, the sun was creeping out through the misty clouds and fairly low in the sky, sinking down behind the Kings Head Pub. I had added in haste the old Town Hall which is now the Arts Centre at a cheated angle which I found made for an interesting composition and allowed me to incorporate the green and still have a view of the street. My composition has multiple points of perspective ; up the hill to the left, into the distance looking at Alexandra Palace and the hint of the road going off to the right. The Arts building is also adding an additional dimensions of perspectives. It is almost an additional drawing incorporated into the panorama, but I do feel that it adds an interest to the composition and captures the flavour of Crouch End. I wanted to reflect the Clock Tower with the Arts Centre tower, and although the size of the building is really too small for the position that it is in, I wanted to glimpse the Railway Tavern that is on the right of the road goes up the hill which you can just see next to the tower. The Kings Head is also a predominant land mark in the town centre and I wanted to clearly see that building too. I have condensed the main shopping buildings and missed out a few terraces, but I think I have captured the essence of the town centre. Incorporating people and vehicles also added to the feeling that there was some life in the streets. I noticed that so many people were on their phones, I drew quite a few people using them, maybe it would have added a sense of humour if everyone was looking at their phones, but that I’ll have to be for another drawing! I did add the Big Issue seller, a homeless person sitting in the street and another with his trolley outside Waitrose. I also felt it was important to include London Buses and a delivery driver on a scooter! The other objects that help bring a sence of realism to the scene are the bus stops, the street lamps and traffic lights, the bin and the benches. I didn’t want to put more street furniture throughout the scene as I felt that it would be too crowded, but by putting some in I think it suggests that these would present throughout the panorama without actually putting them all in. I also thought it was important to include the tree on the green as it adds some organic shapes to the otherwise blocky buildings. I had drawn the Clock Tower quite a few times and also done some sketches of the other buildings that epitomise the town centre for me, and this composition seemed a good way to incorporate everything into one drawing.

Crouch End Town Centre sketch

Crouch End Town Centre – A2 Black Fibre pen sketch version

At first I did not have any suitable A1 paper so at first I sketched the scene out on an A2 sheet, this made the composition narrower and higher. I sketched it in quickly using a black brush and marker pen. I was not keen on this squashed composition, but I wanted to see how it would look so I decided to at least black it in to see if there were any elements that I liked about it. It actually just made me go out and buy some 300gsm A1 paper which I cut in half length-ways so that it was the same size as my original sketch!

Pen and ink is fairly slow to work in as it lends its self to detail especially when working with a fine nib. I used Calligraphy ink with a standard sketching nib for most of the drawing, a small oriental nib to emphasise the people and a fine quill nib to depict the sky. I felt that it was important to add some tone to the road and sky as it is easy to become so involved with the building that you can forget about it. It is quite hard and time consuming to build up dark areas in a pen and in drawing, and I wanted to use this exercise to see how I got on with making some really dark areas to increase the contrast and make the drawing more dramatic, emulating some of the drawings that I had researched for this course. It could still probably go darker, but I decided to stop as I feel that the scene tells its story at this stage and could get too heavy if I added more black. The light was hazily coming from the left hand side so the shadows cast off to the right. As I had created a bit of a fish-eye effect with the road, the shadows fan slightly, the one cast from the tree comes more towards the viewer. I quite enjoyed this drawing once I had the black fibre pen sketch out of my system, the final piece actually too me two days (about 14 hours) to complete. On showing a friend, they immediately knew that it was of Crouch End and actually made me promise to sell it to them once it had been assessed!!

20180409_085830

Crouch End Town Centre – Original Sketch in Conte pencil 840 x 297mm

I did the initial sketches on site and used all these sketches and photographs to complete this final piece. I maybe should experiment with making some more patterns with my pen to depict tone as this helps differentiate different buildings/objects from one another. I think I would have liked a few more pictures of the town to get some additional angles, but the sketches definately helped!

Reference photographs

Crouch End montage

Crouch End, London N8

Exercise 2: Sketch Book Walk

Part 3; Project 2 Landscapes, Exercise 2

Going for a walk in my local area I went looking for views that are notably familiar to me. When I began this exercise The Beast from the East had brought a bitter chill across London and it was way to cold to actually sit outside and draw, so I took photos, and even taking photo’s my hands got so cold I could hardly operate the phone and had to go back indoors. Also the time that I get to work is mainly later in the day when the light is not so good. I did however get the opportunity to sit outside and draw for a couple of my sketches.

I was really interested to see what caught my attention in my immediate local area. I was struck by the diversity of architecture and different type of housing. I had in mind George Shaw’s paintings of council estates and singling out what was normal and mundane and maybe pass you by without noticing. All the sketches except the last are done in my A3 sketch pad.

Pine Grove looking at the back of the houses of Wray Crescent

Pinetree Grove - Back of Wray Crescent

This is a cut through that I often use, it is a dead end street, so not a common route for traffic. I have always been fascinated by the way that the backs of houses differ so greatly as successive owners either build up into the attics or out the backs into the gardens, or even become neglected and run down. I really like the mish mash of the back fences, unseen by the houses themselves as they are mostly covered in foliage, but the facing wall in Pine Grove. This image was very lightly roughed out in pencil then blocked in in black brush pen. I tried to make as many different marks with the pen which has both brush and chisel ends. I also used a Steadler Pigment Liner 0.8 nib to draw in the fine lines and crosshatch areas. This image was done from a photograph in about one hour.

The Banana Building

Banana Building

This block of flats is unique and distinctive and is situated across from the green at the bottom of my road. It is drawn from a photograph in about an hour, then to imply the light coating of snow and the bright blue sky that follower the snowfall the next day I collaged the grass foreground and the sky. I think the collage really added another dimension to the sketch and an element of design that compliments the building itself.

Fire Gate Keep Clear – Corner of Sussex way and Kingsdown Road

Sussex Way and Kingsdown Road

I sat on the green to draw this sketch which took about an hour. I used blue col-erase pencil and added some yellow and brown to emphasise the colour of the bricks and the writing on the road. These houses/flats have always held an intrigue for me, they have a slightly Dutch/German feel to shape of the roofs, I always wonder if they are really hot in the summer or cold in winter, and what is the internal layout? They are quite secretive and imposing behind their heavy solid brick walls and I wanted to capture some of that slightly oppressive feel to what is actually just fairly ordinary housing. I also felt it important to include the street furniture which crowds the pavements as it incessantly tries to inform us of the rules and regulations that litter our neighbourhoods!

Flats across the green at the end of Kingsdown Road

Kingsdown Road

It was warm enough to actually sit out and sketch this view as well. I sketched in a soft pencil, it’s not totally accurate, but does give a fair impression of flat complex. These flats surround the green at the end of my road. They always remind me of summer with their white balconies and the loud music that often emanates from them on a hot summers day. The green has had new trees planted on it in the last few years and is basically just a small green space for dogs to run around on. There is a small children’s play area but it is seldom used.

Christie Court, Pine Grove

Pinetree Grove - Flats

These are the flats that I cut through to walk down the short cut through Pine Grove. I have always been slightly fascinated by these flats as they are situated at the end of a dead end road. They have a sort of castle-like appearance with their very vertical lines and alternating brick and glass panels. Some are better kept than others and the state of the curtains and blinds that are either open or permanently closed paint a picture in a strange way the stories of the lives of the occupants. The sketch was done from a photograph and was done in graphite blocks and calligraphy ink and took about an hour and a half.

The Architects house in Pine Grove

Pinetree Grove - Architects House

This house is also on the cut-through route down Pine Grove, it is really distinctive with its imposing solid red brick walls and small windows. The windows on the other side of the walls are far larger and you can just get a glimpse of this from the street, making the house very private, but also a proud statement in a secret street. I wanted to include it in my sketches as you can’t fail to notice it as it really adds to the diversity of the area.

Hanley Road

Hanley Road

This street is a few roads up from my street. I wanted to include it in my sketches as I felt it important to represent the Victorian terraces in the collection of architecture that I chose to sketch. The area is largely made up of two and three storey Victorian terraces that are interjected with new builds in pockets that were probably bombed in the war or become run-down and demolished. I really liked this view as it represents the spread of regeneration of the area as one by one the old Victorian terrace houses and converted flats are done up, had loft conversions and rear extensions to modernise and add value. For this reason I felt it was nice to capture this process as this cream detailed property got a much needed facelift. This sketch was done from a photograph as it was too cold to sit out and took about three hours, sketched out in blue pencil first then sketched in calligraphy ink then a watercolour wash added at the end. I did try to sketch as quick as possible, but it is quite slow sketching with a dip pen!

Grenville Gardens Children’s Play Area

swing in Grenville Park

Finally I did a quick sketch from a photograph in pencil in my A5 sketch pad of this play area that I discovered for the first time on my walk around the local area. The sketch only took about15 minutes, I wanted to protrey it in a quite a graphic way as I really liked the way that the tree made such a distinctive and decorative shape around the play area and the man pushing the child on the swing. I think this could make a good image to work up in a different media such as lino cut.

Reference images

Sketchbook Walk comp

Project 4: Exercise 3; Material Differences

Part 2, Project 4, Exercise 3 – At Home (3 versions; Living Room, Kitchen and Conservatory)

Material Differences

This exercise requires me to have by now a clear idea of the basic elements of my drawing and to work on a large scale A2 or A1

  • Use light marks to map out the composition, being sure to use all of the picture space
  • Look carefully at how the light falls across your subject, half close your eyes to see the broad tonal areas and map them onto your drawing.
  • Thinking back to the exercises using different materials select an appropriate material or set of materials to take the drawing through to resolution.
  • Keep looking from your subject to the drawing while squinting to check tonal values.

The Living Room

Livingroom

I had sketched up 4 different views of 4 different compositions in the previous exercise and had to choose which to work on. All three of my pieces that I worked up for this exercise I did on A2 watercolour paper. The first exercise I attempted was the Living room. I looked at my sketches and decided that I wanted a slightly more complete view of my scene than the sketches showed, so in a landscape format in order to get as much panorama as possible, I pushed back my viewpoint in order to include both the table and the ceiling light in the composition, I felt that this would give a greater sense of the space that makes up the room. It also enables me to incorporate a wider expanse of the window, which I felt was more interesting to leave open at the top to get a glimpse of the houses on the other side of the street and the reflection in the window of the Living room ceiling light. Reflections were about to become a feature in this and my next few paintings, something I think I was influenced by in the recent research into domestic spaces.

My original sketch was done with an oriental nib dip pen using calligraphy ink and black Quink ink wash. I used the same oriental nib dip pen and calligraphy ink for the line work as well as adding some detail with a standard mapping nib and only used the black Quink ink to wash on the sofa and the fireplace as I did in my sketchbook monochrome version. For the rest of the image I used a watercolour wash to represent the colour areas. I sat on the floor to get a vantage point that would allow me to easily see my whole composition. I chose to do the scene at night as it goes dark so early that I had more time in the hours of darkness. I had to layer the walls and shadow areas a couple of times as with just a single coat the image had little clarity or oomph and looked washed out without proper tonal representation. The dark outside area I used a conte pencil and a bit of black watercolour wash as I wanted a different texture to differentiate the different areas. I had done a quick panoramic sketch in black and white in my A3 landscape sketchbook which was much looser, it was this that I wanted to replicate. However as usual, I found that when I had a fresh sheet of paper that I was to produce a finished piece on, I tightened up!!

I am fairly pleased with the end result, I like the way the highlights are represented on the sofa and fireplace, and I tried to be quite loose with my line work while still keeping a degree of accuracy to the drawing to give some life to the scene, I had in mind my tutor’s comments to try and be a bit looser and experimental with my work. With this in mind I still felt that my drawing was a bit illustrative and could probably go further, so I then embarked on another drawing as I wanted to see how a different scene would play out.

panorama

Panoramic sketch for living room

I then sketched out two more drawings, the conservatory I would have to do in daylight as there is no light or heat in there, and the kitchen, which is pretty dark even in the daylight, so I always have the light on in there which means that I could work on that drawing at any time. It was just the view through the window had to be done in daylight as I wanted the garden to be represented in daylight.

The Kitchen

Kitchen

Guided by the sketches that I did in my sketchbook, I really liked the one that I did of the kitchen sink and window in a mapping pen nib, calligraphy ink and watercolour wash. I particularly liked that the view through the window was represented in a completely different style in blue col-erase pencil and the way I had left all the objects and food on the shelves white with just pen work, the only kitchenalia that I puta really lightwash on was the breadboard as I felt it glared too much left white, but I didn’t want to make it feel like part of the counter and make it too dark. The tonal areas are represented both with inked crosshatch shading and as far as the background is concerned, with darker wash. I think the food stuffs being left white make the whole drawing much more interesting, as does the blue pencil work, it really makes you feel that there are different uses for each of the areas; preparation, storage and view. I had done a quick A3 drawing of just the knives in this similar style to the sieves in my sketchbook and this style with the watercolour wash, this sketch also helped me decide on my final choice of medium to represent this scene in.

Knives

Test A3 sketch of Knives

The composition that I chose was I felt the most dramatic of the 4 sketches. I sat on a stool at the end of the counter as I had to ensure that I included enough of the view through the window for you to really get a feel for what you would actually see outside as well as including the dramatic foreground of the work surface. I think it was more interesting to have the storage to one side rather than the centre of the composition and the drama of the large hanging frying pan that leads you off the page and almost into the darkness of the hallway through the arch of the cut-away wall.

I don’t think I have tackled the ‘loosening up’ as much as I set out to do, but Iam happy with my combination of media that makes up the drawing, suited to differentiating the clutter from the character of the room itself.

Conservatory

Conservatory.jpg

Finally I got up early to have a good long daylight session in the conservatory. I based this drawing in style on the sketch from my sketchbook in which I included some collage and used Inktense pencils with a pretty fluid wash of water. Compositionally, I wanted to include a dramatic close-up in the foreground of the bicycle with enough of a view of the conservatory itself for the viewer to know where you were. I liked the sketch that I did with the bicycle seat in the foreground, it is bold and dramatic, however I also liked the shapes that the handlebars of ‘Racy Lacy’ my lovely bike made, for this reason I positioned myself carefully in order to incorporate all these elements. After sketching out the composition in blue Col-erase I then added collage to represent the frosted window and the wooden work bench before using Inktense pencils and block pastels to draw in the colour. I found that layering lots of colours worked best and coloured the whole image before adding any water wash to it. When I did add the wash I had tissue in hand at all times so that every time I put brush to paper I could control the amount of water that I wanted to put down, and clean it pretty much after each stroke. In this way the multiple colours blended together a little, but still left most of the texture and drawing showing through.  I treated each shape and section individually, and once I had put the water wash over the whole image I stood back to reflect on it. I also photographed the scene from the same viewpoint as I had been sitting, and this really helped to clarify where I could improve the image. The photograph helped me realise that the glass actually reflected the inside of the conservatory quite a lot and that I had concentrated on what I had drawn outside too much and made it too dark. When I then used a white Inktense pastel to draw in the reflections and to add highlights, the drawing really came together.

I made a few adjustments to some of my angles on the bike and then I was finished and could put the three images together and reflect properly on them. As I wrote in my blog about the drawings around the house that I struggled with the fact that I had done them in a sketchbook rather than on separate sheets of paper I was pleased to have the opportunity to take three of the scenes through to final drawings. I do think on reflection that if I had done the initial sketches aroundthe house on seperate sheets of paper I certainly would have not been free and energetic with my sketches.

I enjoyed doing this drawing and am pleased with the outcome, I like the addition of collage, I think it adds texture and a secondary level of interest that takes it away from being just a representation of a scene. I also like the slightly unusual angle, one that is not a normal point of view, it also draws you up as the perspective leads you outside, but makes you look a little harder as you have to peer through the reflections in the glass.

Interior exercises

Pictorial reference for this exercise